Overview
This application allows the user to record any petty cash receipts. The function also exists to reprint a list of the receipts.
Typical Users
Project Managers
Risk Factors
None
Function
Once opened you will view the following screen:
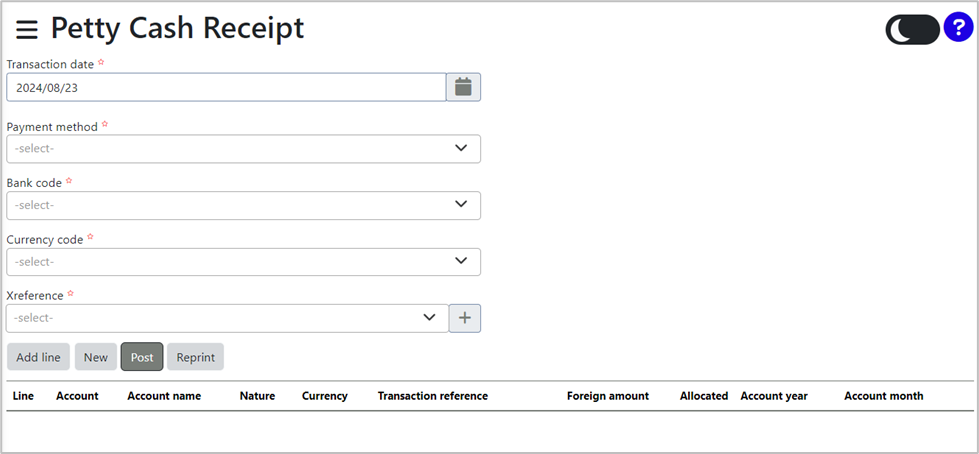
Complete the fields. Fields marked with an asterisk (*) are compulsory.
The transaction date can be amended by selecting the ![]() button.
button.
The payment method can be selected by clicking on the arrow, which opens a dropdown menu. You can choose between Cash, Cheque, or Transfer.
Select the bank code from the dropdown menu.
The currency code will be automatically selected based on the Bank Code. For example, if the Bank Code is set to ZAR, the currency code will automatically be ZAR.
Select the Xreference using the drop down arrow, if the required reference does not be displayed in list select ![]() and the add a reference description screen will be displayed, enter the description and select
and the add a reference description screen will be displayed, enter the description and select  .
.
To add a line, select the ![]() button – a new screen will be displayed. Complete the fields.
button – a new screen will be displayed. Complete the fields.

Fields marked with an asterisk (*) are compulsory.
Select the applicable “Account” and “Nature of Expense” from the dropdown menus.
Enter the Received from account.
If the receipt value includes tax, ensure the checkbox next to 'Receipt Value Includes Tax' is ticked. This will enable you to select the tax code from the dropdown menu in the upper right corner.
The exchange rate is automatically linked to the account. If you need to override the exchange rate, ensure the checkbox next to 'Exchange Rate Override' is selected. This will allow you to manually enter the rate in the Base 1 and Base 2 fields on the right-hand side.
Enter the amount in the 'Amount' field on the right-hand side. If the 'Exchange Rate Override' is not selected, the Base 1 and Base 2 fields will be automatically populated.
Once all fields are completed, click the ![]() button. You will be returned to the Petty Cash Receipt screen, and the newly created entry will be displayed at the bottom of the page.
button. You will be returned to the Petty Cash Receipt screen, and the newly created entry will be displayed at the bottom of the page.
More lines can be added by selecting the ![]() button.
button.
Selecting the  button will discard the current receipt, allowing you to start again.
Selecting the ![]() button will save the receipt document. A confirmation pop-up will be displayed to indicate that the receipt document was saved successfully.
button will save the receipt document. A confirmation pop-up will be displayed to indicate that the receipt document was saved successfully.

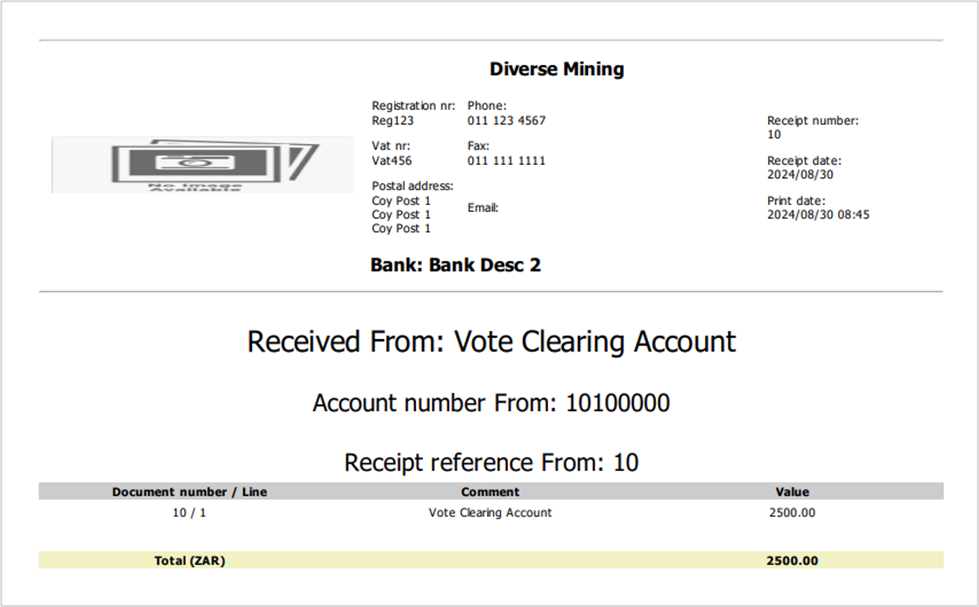
Selecting the 'Reprint' button will open a new tab with a printable and savable document of the receipt.